What is India Taxation Configuration in NetSuite GST/TDS?
- Netsuite has developed the ‘India Localization Tax Engine’ which is a SuiteApp.
- To manage the transaction and various tax situations, such as GST, TDS, Tax on Tax etc, you can use Localization SuiteTax Engine SuiteApps.
Step 1:
Install the below SuiteTax Indian Localization Bundles in a correct sequence which are mentioned below :
- Priority 1. 237702 - SuiteTax Engine
- Priority 2. 239499 - SuiteTax Data Records
- Priority 3. 400562 - India Localization SuiteTax Engine
- Priority 4. 400554 - India Localization SuiteTax Reports
To Install the SuiteTax Indian Localization Bundles, follow the given steps:
- Go to Customization > SuiteBundler > Search & Install Bundles.
- Search for the above-mentioned bundles, In the Keywordsfield.
- Click on the Search button.
- Click on the bundle link which you want to install.
- To install the bundles, click on the Install
To install the SuiteTax Engine SuiteApp, first you have to enable the SuiteTax in your Netsuite account.
Step 2:
- You can use India Localization SuiteTax Engine as the tax calculation engine, only when the SuiteTax feature is enabled in your NetSuite account.
To Enable the SuiteTax Feature:Navigate to: Setup > Company > Enable Features > Tax tab > SuiteTax = True .
Step 3:
GST Tax Rate Rules:
Navigate to: Setup > India Localization > GST Tax Rate Rules.
To create New Tax Rate Rule:
- Click on ‘New Tax Rate Rule’ button on the GST tax rate rules page. After clicking on that button the ‘Tax Rate Rule’ page will open.
- Fill in the necessary details on the Tax Rate Rule page.
Subsidiary Registration Type:
Under this tax rule, select the subsidiary's registration type.
- Regular
- Composite Dealer
Classification Of Supply:
- Select the Classification of Supply that this tax rule will be applied to,
Inter-state supply attracts IGST, its tax rate would remain the same as the GST rate. - Intra-state supply attracts both CGST and SGST or UTGST, the GST rate and tax amount are divided equally into the two heads namely SGST and CGST or UTGST.
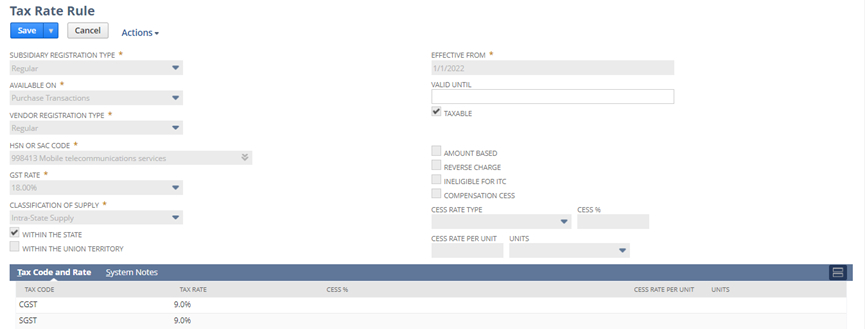
Click on the Save button, after all mandatory fields are filled.
Step 4:
Tax Type:
To create a tax type, Navigate to:
Setup > Accounting > Taxes > Tax Type > New.
Link the GL code Nexus wise with the Tax Type.

Step 5:
Nexus:
To collect taxes and pay, you can set tax priorities for each Nexus.
To create a Nexus, Navigate to : Setup > Accounting > Nexus.

Tax Agency: To Link the Tax Agency to the Nexus.
- Default tax agencies are set up automatically by the system when you create a nexus.
- You can use a vendor as a tax agency.
To create a Vendor, Navigate to: List > Relationships > Vendors > New.
- Here, select category as tax agency for using vendor as tax agency.
- Now in Nexus setup you can select that vendor as tax agency.
Step 6 :
Create Following Records:
- Subsidiary
- Vendor
- Customer
- Item
1) Subsidiary:
- To create Subsidiary, Navigate to : Setup > Company > Subsidiaries.
- Create a Subsidiary with below details:
- Enter Subsidiary Name.
- Enter PAN Number, i.e Permanent Account Number.
- Enter TAN Number e Tax Deduction Account Number).
- The Tax Registration Details (GST Registration) update under Tax Registration Subtab.

1) Vendor:
- To create a Vendor, Navigate to : List > Relationship > Vendors.
- Update Tax Related Details (Under Finance Subtab) in Below Fields:
- Registration Type (Regular/Unregistered/Overseas/SEZ/Composite Dealer)
- PAN Availability (Available/Not-Available/ Invalid /Applied)
- Enter PAN Number of Vendor
- Enter TIN Number if Available (Tax Identification Number)
- Go to Tax Registration Sublist and update in below details:
2) Customer:
To create a Customer Navigate to : List > Relationship > Customers.
Update Tax Related Details (Under Finance Subtab) in Below Fields:
- Registration Type (Regular/Unregistered/Overseas/SEZ/Composite Dealer)
- PAN Availability (Available/Not-Available/ Invalid /Applied)
- Enter PAN Number of Customer
- Go to Tax Registration Sublist and update in below details (If a customer has 3 different Registration numbers then add against same customer).
3) Item:
- To Link, the HSN/SAC Code with Item, Navigate to : List >Accounting >Items.

- Click on Edit.
- Click the Accounting
- In the HSN or SAC Code field, Under the India Tax Information section, select the default HSN or SAC code for this item record.
- In the Reporting UQCfield, select the UQCe. Unique Quantity Code that belongs to the item’s unit type.
- Click Save.
Step 7:
Tax Deduction at Source - TDS Configuration:
- The India Localization Tax Engine SuiteApp enables you to calculate Tax TDS on vendor bill transactions.
- When the invoice or actual payment is issued then tax is deducted.
To create Tax Deduction At Source, Navigate to : Setup >India Localization > TDS Tax Rate Rules.

To create Tax Deduction at Source, you have to Fill the mandatory fields and save the page.
Step 8:
Create TDS Section Code and Link with GL Code:
To create a section code Navigate to : Setup > India Localization > TDS tax rate rules.
- Click the New Record link and enter a unique code & name for the Section Code field.
- Click Save.
- After the TDS Section code is generated, link that code with the GL code.
- To link the TDS Section Code with the GL code, Navigate to : List > Accounting >Accounts.
- On the Account page, give the generated code in the ‘India Tax Section Code’ field.

Step 9 :
TDS GL Impact:
To see the TDS GL Impact, Navigate to : Transaction > Payables > Enter Bills > List.
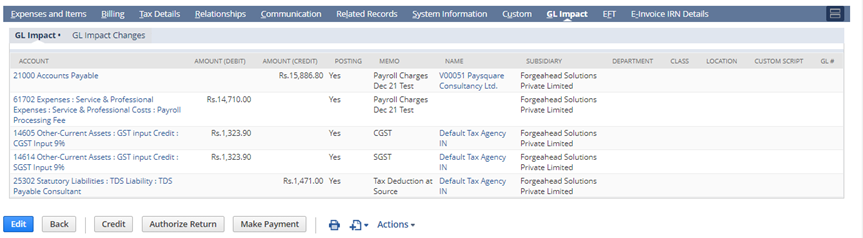
Thus, a platform like NetSuite makes managing the business a lot easier. NetSuite can help businesses significantly, Company can significantly improve India Taxation Configuration in NetSuite GST/TDS and resolve issues with automated tools and real-time information.
Feel free to connect with us in case of any query, Our experts at Blueflame Labs having immense experience regarding such implementations will be more than happy to assist you.


 Strictly Necessary Cookies