
There are various ways to perform deployment in salesforce as below,
How is Copado different from the rest of the other deployment tools?
Copado helps us to deploy quicker as well as smarter with fewer errors and no more repetitive manual tasks, also we have more fun deploying with Copado Salesforce. It also helps us to manage multiple projects in parallel while also decreasing the problem resolution time.
Copado features:
Copado allows us to create deployment using various ways.
Before creating a deployment, we should have created Source Org and the Destination org credentials. Let us take a look at each one of them below:
While creating deployment using Deployment Tab, we have four different options:
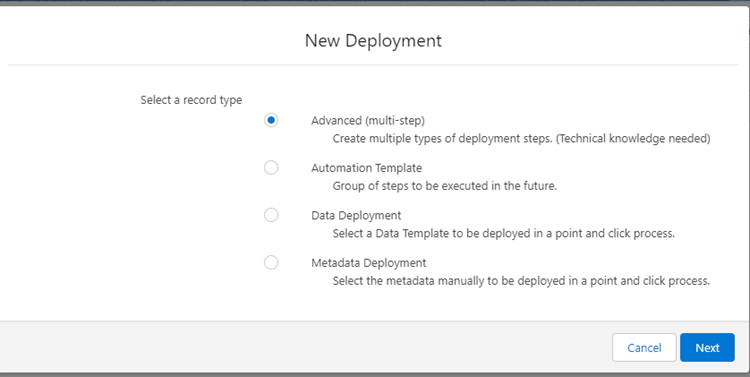
Select an option according to your requirement. Click on Next you get the below screen.
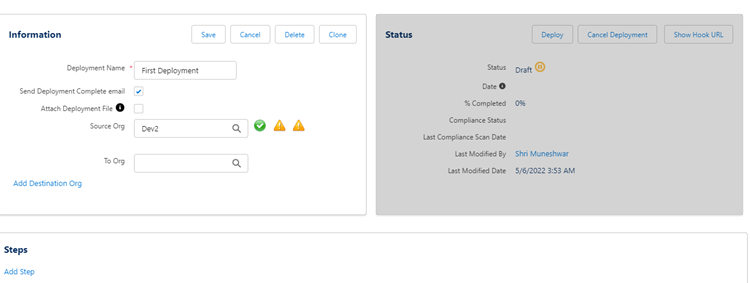
Give your deployment name.
Select Source and destination org.
Add the required steps.
Save your deployment.
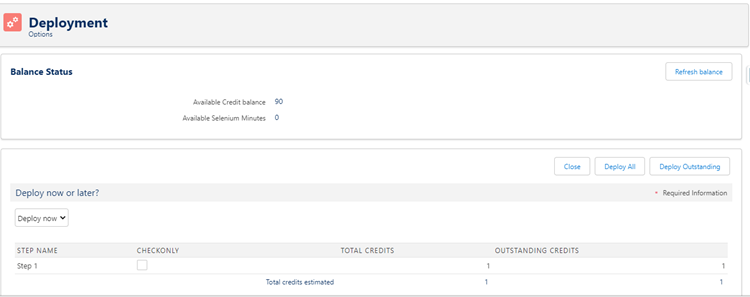
When you manually create the deployment, Copado automatically does not start deployment. We need to click on deploy or deploy all.
2. Creating deployment from User Story record.
When we deploy using the user story record, we need to select Promote and Deploy checkbox on the User Story record. It will trigger the creation of promotion and a deployment record will execute the deployment.
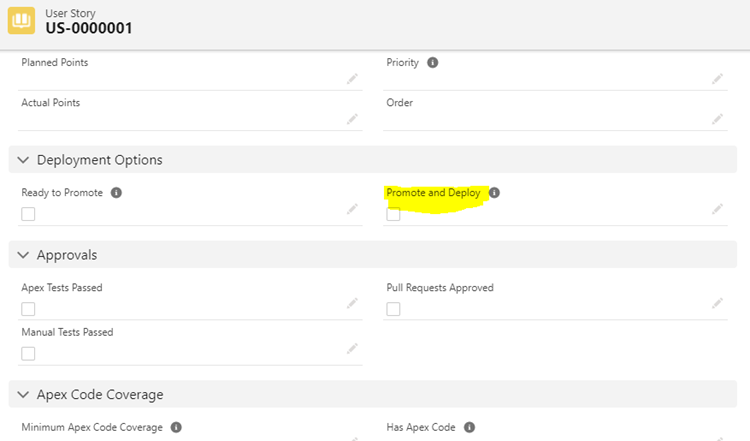
To check if our deployment is successful, click on Validate Changes to validate the deployment. Then you can go ahead and execute the deployment.
3. Creating deployment from a Promotion.
If we want to deploy using a promotion, follow the steps below-
We can create promotions by selecting user stories that we want to deploy. But the user stories we are selecting must have Ready to Promote flagged.
1. Go to the Selected User Stories section in the Promotion record.
2. Select the user stories which we want to deploy from the list of available user stories.
3. And then click on Create Deployment:

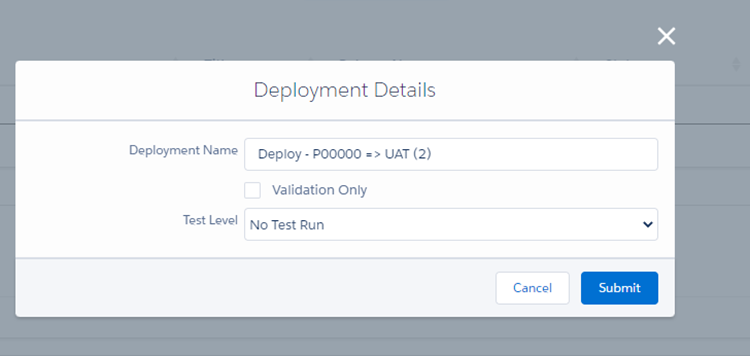
4. A pop-up window will appear next. This is where the test level that you want to apply against your deployment can be chosen.
To create a validation deployment, flag the Validation Only checkbox.
If required, we need to select the checkbox against Attach Deployment File option.
While we just discussed how to deploy via Copado, let’s quickly look at the pros and cons of the same.
Advantages of Copado
Disadvantages of Copado
Blueflame Labs is one of the best Salesforce Consulting Partners, providing a wide range of valuable Salesforce Services to clients.
To know more – Get in touch with us today.

Mastering Data Preparation with Salesforce CRM Analytics Recipes
Read More
Rootstock Order Management
Read More
Strategies for Effective Data Analytics and Visualization in Decision Making
Read More
Enhancing E-commerce Experiences through Advanced Cloud Solutions
Read More
Leveraging Oracle NetSuite for Scalable and Integrated Business Management
Read More
The Future of Business with AI and Machine Learning in CRM Solutions
Read More
Innovations in Salesforce Implementation through Maximizing Customer Engagement and Operational Efficiency
Read More
Different Types of Power Apps
Read MoreWhen you visit any website, it may store or retrieve information on your browser, mostly in the form of cookies. This information might be about you, your preferences or your device and is mostly used to make the site work as you expect it to. The information does not usually directly identify you, but it can give you a more personalized web experience. Because we respect your right to privacy, you can choose not to allow some types of cookies. Click on the different category headings to find out more and change our default settings. However, blocking some types of cookies may impact your experience of the site and the services we are able to offer.
These cookies are necessary for the website to function and cannot be switched off in our systems. They are usually only set in response to actions made by you which amount to a request for services, such as setting your privacy preferences, logging in or filling in forms. You can set your browser to block or alert you about these cookies, but some parts of the site will not then work. These cookies do not store any personally identifiable information.
These cookies enable the website to provide enhanced functionality and personalisation. They may be set by us or by third party providers whose services we have added to our pages. If you do not allow these cookies then some or all of these services may not function properly.
These cookies allow us to count visits and traffic sources so we can measure and improve the performance of our site. They help us to know which pages are the most and least popular and see how visitors move around the site. All information these cookies collect is aggregated and therefore anonymous. If you do not allow these cookies we will not know when you have visited our site, and will not be able to monitor its performance.
These cookies may be set through our site by our advertising partners. They may be used by those companies to build a profile of your interests and show you relevant adverts on other sites. They do not store directly personal information, but are based on uniquely identifying your browser and internet device. If you do not allow these cookies, you will experience less targeted advertising.

 Strictly Necessary Cookies